Showing posts with label Windows Vista. Show all posts

Monday, 22 October 2012

How to Install Dual Boot Windows 7 with XP/Vista ?

Windows 7 has proved to be quite the drastic improvement over Vista, enough that it even has XP stragglers crawling out of the woodwork to check it out. Your chance to test drive the release candidate is now running thin, in fact, if you haven’t tried the new OS until now you are better off postponing your plans for a week and installing the real thing. The final version of Windows 7 has already been sent to partners and is scheduled to debut publicly later this week on October 22.
Even if you have pre-ordered Microsoft’s latest OS, installing it on top of your existing copy of Windows may feel a bit premature if you haven't been running the beta or RC as your main installation. Thankfully, setting up a dual boot configuration is both easy and practical. If you’re looking for a quick and dirty, yet thorough how-to on getting Windows 7 to run alongside your installation of XP or Vista, read on.
Step 1:
Create/Obtain an Installation Disc
Yes, we’re all aware most motherboards these days allow you to boot from a USB flash drive, but setting that up is a guide in itself. We’re going to assume that you either already have a Windows 7 DVD, or have an ISO file. If the former is true, feel free to skip ahead to Step 2.
To create a Windows 7 disc, pop a blank DVD into your burner, and burn it as an image file with any of the countless apps that can handle ISOs. Our personal favorite is ImgBurn, but to name some others: Burn4Free CD and DVD, CDBurnerXP and Ashampoo Burning Studio Free.
Step 2:
Create a New Partition
Editor’s note: Before continuing I’d like to take a moment to acknowledge the fact that data corruption is a possibility. Even though this guide is absolutely harmless, random software anomalies can and do occur – do yourself a favor and backup your precious data before proceeding.
Moving on to more pressing matters, we will need to create unallocated disk space by resizing an existing partition in your current hard drive, and then create a new partition on that free space for Windows 7 to run on. Most of you who are reading this will probably only have one existing partition, dedicated to the operating system you’re currently using.
With that in mind, to help you in the process of creating a new partition we’ll be looking at two separate approaches. While Windows Vista has built-in utilities to resize active partitions, XP does not, and thus we must resort to using a third party application (GParted).
Create a New Partition on Windows Vista
If you are currently running Windows Vista as your primary operating system, we can use its built-in tools to modify your hard drive partitions. You can also use a third-party tool called GParted, which we are recommending to Windows XP users (see below). You can skip to the XP section and follow the exact same directions if you prefer the GParted route for any reason.
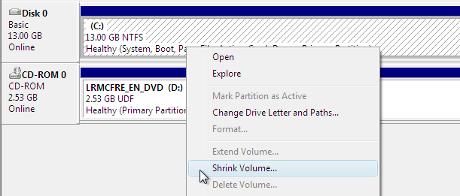
On Windows Vista, click Start and enter “diskmgmt.msc” into the search bar. A window titled “Disk Management” should open displaying basic information about the drives attached to your PC.
Right click the partition on “Disk 0” and select “Shrink Volume”.
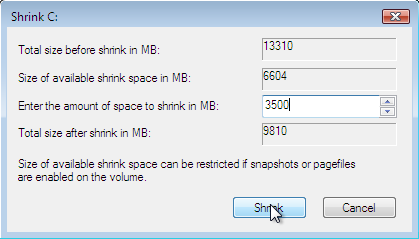
This should present you with drive capacity information as well as the option to enter an amount you'd like to “shrink” your partition by. The recommended minimum partition size for Windows 7 is 16GB, so enter a figure of that size or larger and then hit “Shrink”.
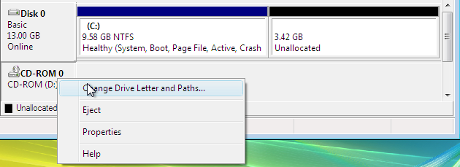
You should now see unallocated space on your hard drive in the capacity you specified, situated just after your now resized original partition.
Before creating a new partition and assigning a letter to it, be a perfectionist and reassign your optical drives to the next letter down from what they are now, so that your new empty partition can have whatever letter follows your first partition (probably “D”).
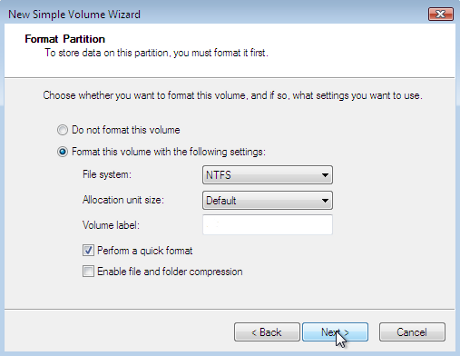
Right click the newly unallocated space and select “New Simple Volume...” which ought to open a wizard screen.
On your way through the wizard you'll be asked to define the capacity for your new volume to be; let it occupy the entire size of the unallocated space you've created, assign it the letter that you've just freed, quick format the volume using the NTFS file system and default allocation unit size (volume label can be anything, just name it Windows 7).
You should now see a healthy primary partition with the capacity and label previously defined replace the unallocated space. With that, you can move on to Step 3.
Read more ...

Friday, 30 March 2012

How to Create a Keyboard Shortcut to Access Hidden Desktop Icons and Files ?

Most of us like me love to keep the icons and some files in the desktop for quick access but ironically I love a clean desktop too. But there is a simple tweak without any additional tool to get the best of both worlds, you can hide the desktop icons & files and create a custom keyboard shortcut to access those icons and files.
Step 1: Hide the desktop icons and files.
Right click on the Desktop, go to View and uncheck the option Show Desktop Icons. Now you will have a clean desktop.
Hide Desktop Icons
Step 2: Create a Desktop shortcut to open Desktop Folder.
All the items in the desktop are stored in the folder under your user name.  Click on Startbutton –> (your username) –> Desktop folder.
Right click on the Desktop folder and click Send to -> Desktop (Create Shortcut). This will create a desktop shortcut to open desktop folder.
Step 3: Assign a Custom keyboard Shortcut to open Hidden Desktop Icons and Files.
Now open the desktop folder like mentioned in step 2.
Right click the keyboard shortcut for desktop you have created just now and clickProperties.
Open Shortcuts tab and click on Shortcut Key box. Now click ALT + CTRL + any letter key to create a custom shortcut and click OK. I usually use ALT + CTRL + D to open desktop folder and Win + D to show desktop.
Now you can open all the hidden icons and files in the desktop in a folder to have a quick access at the stroke of a custom keyboard shortcut.
Read more ...

List of The "Up" Keyboard Shortcut for Windows 7 or Vista Explorer.


The new Explorer window in Windows 7 and Vista doesn’t have an Up button, which drives me completely batty. Thankfully I found a keyboard shortcut replacement.
Note: These screenshots are from Vista, but it works the same in Windows 7.
Let’s say I’m in my x:\wpmu\wp-content directory. Sure, I can usually click the “wpmu” part of the path and simulate the Up button, but it doesn’t always work, especially if I’ve lowered the size of the window or tiled two windows beside each other.
image
This window is 600px wide, shouldn’t I have an easier way to go Up? Turns out I do… if I just hit the following key combination:
   Alt+Up
Ahhh, so much better… now I’m in the parent directory!
Note that this is also the quickest way to get to the Desktop folder… just keep hitting Alt+Up until you get to the right folder.
Other interesting keyboard shortcuts for Explorer:
  • Alt+Right - Go forward
  • Alt+Left- Go back
  • Alt+D – Focus the address bar and select the current path.
  • F4 – Pop up the dropdown in the address bar, actually somewhat useful.
  • Alt+Enter – Properties of the selected file
  • Ctrl+Mousewheel – change the size of the icons
  • F11 - Put explorer into Fullscreen mode. Actually kinda weird, and I have no idea why this function is even there.
Read more ...

How to Create Icons to Start the Screensaver on Windows 7 or Vista ?


Reader Jeffrey wrote in asking how to create an icon to start up the screensaver in Windows Vista. This question is so common that I figured I’d write up the answer for everybody, as well as provide a downloadable set of shortcuts to all the default screensavers (for Vista users).
Note that this technique should work for Windows 7, Vista, or even XP.
Create Screensaver Icon Click here to Download
Right-click on the desktop and choose New \ Shortcut from the menu.
image
In order to launch the screensaver, you’ll need to enter the full path to the screensaver file, followed by “/s”
%systemroot%\system32\Bubbles.scr /s
You would want to substitute the name of the screensaver where you see “Bubbles.scr” above. Also note that I used %systemroot% instead of C:\windows because not every install uses the C: drive.
If you don’t know the filename, you can browse down to your system32 folder and then search for “.scr” using the search box:
You should see all of the names of all the screensavers installed on your system, which you can use in the location field.
Download Shortcut Icons Click here to Download (Vista Only)
If you’ve prefer, I made shortcuts for all the default screensavers and zipped them up. You can just download and extract the file, and then use whichever ones you want.
Note: I’m fairly certain I didn’t miss any default screensavers in the list, but it’s certainly possible since it’s 6am and I’m still awake.

Read more ...

How to Disable Win+X Shortcut Keys on Windows 7 or Vista ?


Windows 7 and Vista have all the same Windows+X shortcut keys as other versions of Windows, such as Win+E for explorer and Win+D for the desktop, but adds in all of the Win+<num> keys to launch the shortcuts in the Vista Quick Launch menu (or switch to apps in Windows 7), as well as Win+X for mobility center, etc. But what if you want to disable all these extra keys?
Turns out you can disable all the extra keys at once with a single registry entry, which I’ve provided as a downloadable registry hack.
Manual Registry Hack
Just open up regedit.exe through the start menu search box and navigate to the following key (create if it doesn’t exist)
HKEY_CURRENT_USER\Software\Microsoft\Windows\CurrentVersion\Policies\Explorer
image
Create a 32-bit DWORD value called NoWinKeys and set the value to 1. You’ll need to log on and back off for the changes to take effect.
To disable: Unzip the file and then double-click on the NoWinKeys.reg file to disable all the shortcut keys.
To enable: Unzip the file and then double-click on the RestoreWinKeys.reg file to re-enable all the shortcut keys.
Make sure that you log off and back on in order for this change to take effect. You could also restart explorer.exe through task manager if you wanted.

Read more ...

How to Creat key board shortcuts for application in Windows ?


Do you need just one or a few special keyboard shortcuts for your favorite program(s)? A quick modification to program shortcuts will get you up and running without installing additional software.
Creating New Keyboard Shortcuts
Go to the start menu shortcut for the program, right-click on it, and select properties.
quick-keyboard-shortcuts-01
When the properties window opens click in the shortcut key text area. All that you need to do is choose an appropriate letter for the program (i.e. O for Opera, E for Editra, etc.) and type it in the blank.
You will not need to type any other keys or combination in…the “Ctrl + Alt +” will be automatically entered for you as soon as you type the letter in. Click OK to finish creating the new keyboard shortcut.
Those new keyboard shortcuts will speed up access to your favorite software.
Another example from our system using “I” for Iron Browser.
Certainly much quicker than using the start menu.
Read more ...

useful key board Shortcuts.


Global Windows Shortcuts

Win+1, 2, 3, 4, etc. will launch each program in your taskbar. It is helpful then to keep your most used programs at the beginning of your task bar so you can open them one right after another. This also works in Windows Vista for the quick launch icons.
Win+Alt+1, 2, 3, etc. will open the jump list for each program in the taskbar. You can then use your arrows to select which jump list option you want to open.
Win+T will cycle through taskbar programs. This is similar to just hovering over the item with your mouse but you can launch the program with Space or Enter.
Win+Home minimizes all programs except current the window. This is similar to the Aero shake and can be disabled with the same registry key.
Win+B selects the system tray which isn’t always useful but can come in very handy if your mouse stops working.
Win+Up/Down maximizes and restores down the current window so long as that window has the option to be maximized. It is exactly the same as clicking on the middle button on your windows.
Alt+Esc is like Alt+Tab but switches windows in the order they were opened and does not have the fancy window preview overlay.
Win+Pause/Break will open your system properties window. This can be helpful if you need to see the name of a computer or simple system statistics.
Ctrl+Esc can be used to open the start menu but will not work as a Windows key replacement for other shortcuts.
Ctrl+Shift+Esc will open the task manager without needing to hit Ctrl+Alt+Del first.
Alt+Space will open the window system menu which can be used to maximize (x), minimize (n), close (c), or move (m) the window which can be especially helpful if your window is somehow off-screen. This shortcut can also be helpful with windows that don’t close with the Alt+F4 shortcut such as the command window.

Windows Explorer Shortcuts

Here are handy shortcuts built into Windows Explorer which may have similar features in other programs too.
Alt+Up will navigate up one folder level since the up arrow on the menu bar was removed in Windows Vista. Alternatively, you can also make Backspace go up one folder level with a handy AutoHotKey script.
Shift+F10 opens the contextual or “right click” menu for a file/folder. This can be very handy for speed especially if you know which option you want to select. Look for an underlined letter in each option to know which letter you can press for faster access.
Shift+Del deletes a file without sending it to the recycle bin because who wants to empty their recycle bin anyway?
Ctrl+Shift+N creates a new folder in your current directory.
Alt+Enter opens the file properties so you can view file size, sharing settings, and creation date.
F2 renames a file or folder.
F3 will open explorer and select the search bar. If you already have an explorer window open it will highlight the search bar. In some programs it will also open the search dialog to search within that program.

F6 cycles objects in the current window. In explorer this will cycle between the location bar, options bar, left pane, and right pane. It also works with varying success in other programs.
F10 toggles the file menu in explorer.
Read more ...

How to Make Backspace in Windows 7 or Vista Explorer Go Up like XP Did ?


One of the biggest annoyances for those going straight from XP to Windows 7 is that the backspace key no longer moves you Up a folder like it used to—now it moves you Back in the folder browsing history.
If you’ve used the key a couple of times, you might think I’m wrong—but you can easily test it out by going into one subfolder, then hitting Back, then going into another subfolder and hitting Back, then going into a third subfolder and hitting Back twice. You’ll end up in the previous subfolder.
If you want to go Up a folder in either Windows 7 or Vista, you can use the Alt+Up shortcut key, which will always go to the parent folder.
The Awesome AutoHotkey Fix
Now that we know the shortcut key that actually works in Windows 7, we can use a small script to make it work the way we really want it to. With AutoHotkey installed, create a new script with New –> AutoHotkey Script, and then paste in the following:
#IfWinActive, ahk_class CabinetWClass
Backspace::
   ControlGet renamestatus,Visible,,Edit1,A
   ControlGetFocus focussed, A
   if(renamestatus!=1&&(focussed=”DirectUIHWND3″||focussed=SysTreeView321))
   {
    SendInput {Alt Down}{Up}{Alt Up}
  }else{
      Send {Backspace}
  }
#IfWinActive
How Does This Work?
Ordinarily you can simply re-map the key with a Backspace::!{Up} type of deal, but since the backspace key is useful in the search box, location bar, and when you’re renaming files, you can’t just do a simple mapping—instead you have to check to see which control is active before sending the alternate Alt+Up key combination.
The first line with the #IfWinActive tells AHK to only activate this shortcut key override if Windows Explorer is the active window, which helps fix any possible conflicts in other applications.
The ControlGet and ControlGetFocus lines do the actual work of checking the status of the controls, and then depending on whether they are focused or you are in the process of renaming a file, it either sends the alternate Alt+Up or just sends the regular Backspace key.
Download a Pre-Made Application to Make Backspace Work like XP
Since the majority of you probably aren’t familiar with AutoHotkey, and don’t have any interest in how the scripts work, I’ve put together a customized version of the script as a tiny little executable that will run in the background.
It doesn’t take a ton of memory, as you can see in the screenshot.
To install HTGBack, just download, extract, and then create a shortcut in the shell:startup folder:
Double-click on the executable, and your Backspace key should start working like it used to in XP. Note that we only tested this on Windows 7, but assume it will work for Vista as well.
Read more ...

How to Create a Shortcut for Locking Your Computer Screen in Windows 7 or Vista ?


The quickest way to lock your computer screen is to just use the Win+L keyboard shortcut. Some people prefer to use the mouse to lock the workstation, however, or would just like to have both options.
Here’s how to easily create a shortcut to lock Windows 7, Vista, or even Windows XP as well.
Right-click wherever you want to create the shortcut, choose New, and then Shortcut.
Enter the following text into the shortcut textbox. Note that the screen will look different on Windows XP, but the same text should work.
rundll32.exe user32.dll, LockWorkStation
Enter a name for the shortcut, and then click Finish. That’s about all there is to it.
Read more ...